Pages

3.22.2012

Margaret's Dark Chocolate Brownies with Sea Salt & Meyer Lemon


This post is courtesy of the wonderful Margaret, author of Glorious Generalist.

This recipe is based on this recipe for Extra-Dark Brownies with Sea Salt & Lime. I modified it a bit to make it more cakey and less fudgy.

Dark Chocolate Brownies with Sea Salt & Meyer Lemon

16 2-inch square brownies
1/2 cup unsalted butter
4 ounces unsweetened chocolate, in squares
1 cup sugar
1 cup all purpose flour
1/4 cup cocoa powder
2 large eggs, lightly beaten
1 teaspoon vanilla
1/4 teaspoon kosher salt
1 Meyer lemon, juiced and zested
1 ounce unsweetened chocolate, finely chopped
1 teaspoon flaky or coarse sea salt. Be sure it’s not too fine or it will sink into the batter.


Preheat oven to 325°F and line an 8×8-inch baking pan with parchment paper, leaving the paper extra-long and hanging over two sides.

Place a glass bowl over a pot of simmering water. Melt the chocolate and butter slowly in the bowl. Allow to cool slightly.

Sift together dry ingredients.

Beat wet ingredients together with a wire whisk. Add melted chocolate and butter.

Carefully fold  dry ingredients in to wet ingredients with a wire whisk in three batches. Batter will be thick, but be careful not to over stir. Pour into baking dish, and sprinkle sea salt on top.

Bake for 30 minutes or until toothpick comes out clean. Allow to cool for a few minutes before lifting out the parchment paper and cool on a wire rack. Cut into squares.

-Margaret

3.21.2012

Becky's St. Paddy's Day Colcannon

Between watching Worst Cooks in America and talking to my proudly-Irish friend Erica, I discovered a new food that I was dying to taste.  Colcannon is an Irish staple dish mainly involving potatoes and cabbage or kale.  If you have leftovers, you can form pancakes and fry them up to make boxty.  I didn't have time on St. Paddy's Day to make the Guinness and lamb stew that I've tried in the past, but I did have time to mash some potatoes.

Finished colcannon.  Kale will bring a brighter green color to
your dish, but cabbage is also delicious!

My recipe was inspired by Anne Burrell and Erica L.

Ingredients:

8-10 medium potatoes, peeled
1 leek*
1/2 small head of cabbage, leaves separated*
6 oz shredded Irish cheddar (or to taste)
2 Tbsp. milk
1 Tbsp. butter
1 Tbsp. oil
1/2 tsp. salt
1/2 tsp. pepper


- Bring the potatoes to a boil and cooked them until they are soft enough to mash.

- Finely slice your cabbage and leek.  (I used a bias cut on the leek and a chiffonade cut for the cabbage.)

- Season your cabbage and leek with salt and pepper while you heat the oil in a sautee pan.  Quickly toss your greens in hot oil so that they wilt and become tender, but be careful not to overcook them.  Remove from heat.

- Strain your potatoes and mash them.  Add milk (more than 2 Tbsp. if necessary for desired consistency) and butter.  Slowly add your shredded cheddar cheese, so that it melts in the mixture.

- Add your greens to the mashed potatoes and mix well.

*You could substitute kale for cabbage, and scallion for leek.


Cut cabbage and leek, ready to be sauteed.  

Colcannon was a big hit with my family- and it was an easy way to get my son to eat more green vegetables, by mixing them in with the delicious mashed potatoes.  The leek and cabbage lend a wonderful flavor to the cheesy mashed potatoes, which honestly can get boring.  This made enough to leave us with plenty leftover, which we are going to turn into boxty potato pancakes.  If you try my version, tell me what you think!


-Becky

3.20.2012

Jenn P.'s Yarn and Felt Wreath


There are tons of these yarn wreaths and felt flowers on Pinterest!  I just love them!  I didn't use any particular instructions, but just did my own thing, as it's pretty simple...
 
You need: 
    wreath form (I used a straw wreath, leaving the plastic cover on)
    yarn
    felt
    ribbon
    glue gun
    scissors
    
 
First, wrap yarn around your wreath until it is completely covered.  Use a glue gun to glue the starting end to the back of your wreath.  You can continuing gluing yarn to the back as necessary.  It should stay in place for the most part, but use the glue if you want.  This takes a little while and may wear out your arm.  Some yarn will need to overlap and that's okay.  It won't be perfect, but that is part of the charm.  Just make sure that you cover it all, not leaving any bald spots.  Glue down the end of your yard to the back of the wreath.


Next, I used a contrasting color of yarn to make my diamond pattern.  Again start by gluing the end to the back of the wreath.  Wrap the yarn around the wreath leaving big gaps in between.  When you get all the way around the wreath, secure the end with glue and change direction of your wrapping.  This should be self-explanatory with the picture.  Secure with glue when finished. 


It's already pretty, right?!  But I wanted to add some felt flowers.  There are tons of variations on making felt flowers.  If you search on Google or Pinterest, you will find about a hundred different types of felt or paper flowers with tutorials!  I didn't want to spend a ton of time on mine, so I went with a pretty easy design.  Cut a circle out of felt (the larger the circle, the larger your flower).  Then cut a wavy spiral in your circle.  This should leave you with a long wavy and somewhat curly piece of felt with a small circle left on the end.  Starting at the other (non-circle) end, begin tightly curling the felt around itself.  Try to keep one side fairly even as this will be the back of your flower and creates more wavy "petals" on the other side.  When you reach the end circle, glue this to the flat back of your flower.  Fortunately, felt kinda sticks to itself, so this doesn't unravel easily, making it easier to play with until you get it perfect. 
 

Note:  The wider your wavy felt is = the taller your flower will be.  The more wavy = more dimension in your petals.  Less wavy = flatter flower.  It's all easier than it sounds.  I had never done this before, but I had it down after the second flower!  Easy peasy! 
 

Make flowers in as many colors and sizes as you like and glue them on your wreath.  You can get really creative with this!  I've seen wreaths fully covered with flowers, but I just used a few for my first time. :)  FYI - I kept my flowers mostly flat (less wavy), just because I wanted that look for my wreath.
Finally, tie a ribbon around the top and hang your wreath!  Enjoy!


-Jenn P.  :)

3.19.2012

Corrie's French Macarons


When you think of a macaroon, what comes to your mind first? Most people think of those ooey gooey mounds of coconut, which is all fine and dandy, coconut is delicious!  However, when I think of a macaroon, I think of the French variety- the macaron. 


Author & Editor at Notre Dame, Paris


I first got to try them a few years ago when I took a trip to Paris with my sister. They were the most amazing cookie I've ever tasted, if you even want to call it that. It doesn't really even fall into the "cookie" category, it should be in a category all of it's own. The outside shells are so light and airy, but then you bite into them and they're soft and chewy. They're made with almond flour so they have a light nutty taste, but the fillings dominate the taste. They come in so many different colors too so they're tons of fun!


Beautiful, colorful macaron display at LadurĂ©e, Paris

I never realized until recently just how difficult they are to perfect. I have a new found respect for French bakers for creating such a perfect little treat!  The first batch I made didn't look so good, but at least they were still edible. By the time I put the last batch in the oven I was just starting to get the hang of it. That last batch was far from perfect, but they looked a lot nicer than the first one! In the end, it was completely worth it.


The shells of the macaron only consist of these 5
ingredients (the food coloring is optional)

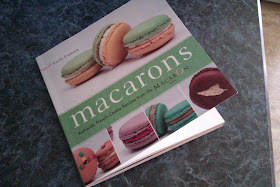
There are many books you can find for the French macaron
recipe, but this is the book I used.

The book goes into step-by-step details with colored
pictures so you can tell if you're doing it right

Gel food coloring...I chose violet, as per my sister's request :)

Beating the egg whites. They're not quite done in the
picture yet, but this was a big difference from where they started!

Sifting the powdered sugar and almond flour together

This is what the batter should look like-glossy and smooth
with few lumps (though mine did have more lumps than picture in the
book!)

The piped shells ready for the oven!

 Aren't they so pretty?

The "perfect" shell should have a good foot to it (that
rough looking edge at the bottom of the shell) Not many of mine had
those, but this batch did!

Filling the macarons. I chose to keep it simple and use Nutella

Once filled, place a second shell on top to form a sandwich.


This is what a bad batch looks like....the wax paper I
used was too big for the tray and the excess moisture in the oven made
the paper collapse and ruin some of the shells...


Enjoy!

-Corrie


3.15.2012

Becky's Daphne Cakes Brag-Fest

Cupcake flower pots for a 4th birthday party

Today I'm going to brag about one of my best friends a little bit.  Kara has some culinary training under her belt, and when we were both living in Germany she started to practice decorating cakes with fondant.  She had always been a great baker, creating delicious confections that made my mouth water at the mere thought.  She also has a very discerning eye for things that are well-made and well-decorated.  She started fairly simply, practicing fondant ribbons and bows that were convincing from a novice.  Kara shared her practice pieces in an online photo album and it was fun to see all of the techniques she essentially taught herself.

I was able to watch her work on this baby shower cake.

Perfectly beautiful and tasteful!

Before too long, Kara's cakes were looking incredible.  She just seems to have a knack for knowing exactly how intense a color should be, precisely how to shape fondant pieces to look whimsical and yet true to form.  Of course it doesn't hurt that underneath the beautiful exterior, her cakes are still completely delicious and, oh, so moist!

This Cars-themed birthday cake was a huge hit!

1st birthday Owl cake
"Look Whoo's 1!"

Now Kara is doing some work for friends (and sometimes friends-of-friends) under the adorable moniker, Daphne Cakes, named in honor of her youngest child.  She has generously provided beautiful, professional-looking desserts for a number of friend's special events.  Kara never backs away from a challenge, either!  She finds an inspiration and figures out how to make that idea come to life on the cake.

A fun Mad Hatter cake

My Little Pony for her daughter's 1st birthday.

This 50th cake has personality!


She has even been awarded the highest prize possible at her county fair, the Best in Show award- and I saw the number of entries, so I can verify that she rightly won against a large number of competitors!

Kara's Best In Show cake
Kara baked my son's first birthday cake to match the theme I chose for the party.  The bottom layer was chocolate and the top, banana cake.  She even made a smaller "smash cake" in banana flavor, my son's favorite.  The cake received rave reviews and I'm still eagerly dreaming of the next time I'll get to eat one of Kara's amazing confections.  

My monkey's 1st birthday cake.

See how perfectly she matched the inspiration design on the plates?

My 1-year-old eats a Daphne Cake with reckless abandon.
Thanks for coming on this photo journey with me.  I hope you enjoyed seeing some of the beautiful work that Kara has done with her cakes.  (She did give me permission to write this, and hopefully she doesn't mind my bragging!)  If you are ever lucky enough to eat one of her cakes- well, you are pretty darn lucky.

-Becky


3.14.2012

Jenn P.'s Easy-Access Measuring Spoon Organizer


Organization for Measuring Spoons & Cups:

I can never seem to find the right size of measuring spoon or cup that I need for a recipe!  And my measuring spoons and connected on a key-ring-like thing, so they always seem to be in the dishwasher.  I saw this project on Pinterest & just had to do it in my kitchen!  The original is much prettier as they painted the sticks and used new and cute measuring cups/spoons.  But mine works just as well. 
All you need is some paint sticks (free at Lowe's & Home Depot) and some screw hooks.  I also used a label maker and some Command mounting strips. 


I measured the inside width of my cabinet and (had the husband) cut the paint stick to size.  If you want you can paint the stick to match your decor.  I just used the plain side (without the "Home Depot" stamp) without painting it.  I spaced out my measuring spoons and screwed in the hooks at the appropriate places.  The wood is soft, so the hooks went in easily by hand.  Then I used my label maker to print out labels of the sizes of each spoon.  I had two sets of spoons, so I just did one label for every two spoons, because they were the same size.  If you don't have a label maker, you could use stickers or even write the sizes on the wood with a Sharpie marker. 
Make sure to check that your new storage will not interfere with whatever you keep in that cabinet.  You want to have it in between cabinet shelves, or it may not fit right, causing your cabinet door to not fully close.  I used "Command mounting strips" to adhere it to my cabinet.  I'm sure you could use glue or nails, but be sure not to nail through to the other side of the cabinet. 

Then repeat the process with another paint stick for your measuring cups.  I haven't gotten to this part yet, mainly because I need bigger hooks for my measuring cups & haven't gotten them yet. 
This has made finding my measuring spoons much easier, but it can be a bit noisy.  We use that cabinet a lot and my metal spoons bump into each other and the cabinet door when we open and close the cabinet.  The harder we open or close the door, the more noise it makes.  It was a bit alarming at first, but I think we're getting used to it now.  I'm going to try to figure a way to quiet it, maybe use string to tie down the spoons or some padding between the door and the spoons.  But you may be better off using a cabinet door that you don't open very often; and certainly don't use a cabinet that the kids get into. 
Good Luck & Have Fun

-Jenn P. :)

3.13.2012

Becky's Personalized Felt Shirt

In writing this I am totally ruining a surprise for a friend, though perhaps she won't see this until her package arrives.


I wanted to make something for my friend Kara's eldest child, J.  He loves Alvin & the Chipmunks and my sister came up with the idea to make him an Alvin shirt with a big yellow 'A' on the front- like the Scarlet Letter but without the negative stigma.  I decided it was a fantastic idea, but put my own spin on it and went with a 'J' instead.  True personalization right there!

3T?!
DMC thread #307
First I picked up a long-sleeved red shirt in his size, and was sad to realize how big he's getting while I miss him growing up, living half way across the country.  I got over that part and bought some yellow felt and yellow cross-stitch thread.  I already had upholstery needles from my last project, and decided they'd be perfect for the effect I wanted with the stitching.  

Next I had to design my letter 'J'.  That was way more difficult than I anticipated!  I looked through my Mac's Font Book and didn't find anything that seemed quite right.  My plan was to print off a large letter J and use it to trace and cut my felt letter.  When I couldn't find anything I liked, I decided to do it freehand.  
See?  Font Book was absolutely no help.
Here you can see that I had to try twice.  Luckily I had the foresight to position the first J to one side of the felt, instead of cutting a big chunk out of the middle in the heat of the moment.  That allowed me to use my first J, which I liked in general, to create a slightly larger version.  I liked version two even more, so I gave my son the first version to play with.  It was a big hit.

Big J, little j, what begins with J?

I love the contrast!

I lined the J up on the shirt where I thought it would look good, and threaded my needle.  I wanted a very bold look to the stitches, so I used the entire six-stranded cross stitching thread together.  I was quickly thankful that I owned the upholstery needles, because the eye was large enough to easily thread the entire thick strand.

Positioned, check.

Threaded, check.
I was ready to stitch the letter on the shirt.  I suddenly realized that I have no straight pins (as I believe I've mentioned in a previous post).  I really need to fix that situation, but was too eager to work on my project at the time, to wait until they were in my possession.  Instead I used some clear tape to affix the felt J in its position.

Who needs duct tape when you've got gift-wrapping tape?
I decided to use a simple back stitch around the entire letter.  I left a small margin, about an eighth of an inch, as I stitched.  I love the way the thick thread looks against the felt.  As I stitched, I removed the pieces of tape.  The only problem I encountered was that the tape wanted to pull bits of the felt away from the rest, but a gentle and slow approach helped to minimize the fuzzy effect.  The needle was absolutely perfect for the fabric weights and weaves.  Stitching the boarder was fast and pretty painless, overall!

Halfway there...

Finished product!

If I were to do this again (and I probably will because it was simple and I love the result!), I'd make sure I have some straight pins on hand for a cleaner and easier project.  I might also consider checking out the world of iron-on adhesives, but for now I'm going to give myself a pass and say "Good job" for making it this far!

-Becky